
APEX MICROTECHNOLOGY CORPORATION ∑ TELEPHONE (520) 690-8600 ∑ FAX (520) 888-3329 ∑ ORDERS (520) 690-8601 ∑ EMAIL prodlit@apexmicrotech.com
1
INTRODUCTION
Fast and easy breadborading of circuits using the SA60 are
possible with the EK06 evaluation kit. The amplifier may be
mounted vertically with the HS20 heat sink, or horizontally.
Connections are provided for required power supply bypass-
ing recommended protection components, as well as optional
current sense resistors. A large area for component mounting
provides flexibility and makes a multitude of circuit configura-
tions possible.
CAUTION
Use the supplied thermal washers or ther-
mal grease between the power amplifier
and the heat sink.
ASSEMBLY
1. On the silk screen side of the evaluation board, insert and
solder the MS06 mating socket in DUT holes 1 ≠ 12. Be sure
each one is fully seated.
2. Solder components for your circuit. Be sure to include proper
bypassing. See the SA60 data sheet for help in selecting
these components. 1uF capacitors and a .10 resistor have
been included with the EK06 kit but may be replaced with
other components as necessary. C1, not provided, should
be selected for the voltage required by the application. See
Apex Application Note 30 for guidelines in selecting this
bypass capacitor. If current sense resistors are not used,
the I SENSE traces on the EVAL11 board must be shorted
to power ground in place of the resistors.
3. Place the TW07 thermal washer on the heat sink over the
mounting hole for the DUT. Place a #6 screw through the
mounting hole and thread a #6 nut onto the screw at the back
of the heat sink. Do not tighten. Note that there are two sets
of mounting holes on the HS20). Holes on one edge allow
room between the DUT and evaluation board for the MS06
socket. The holes on the other edge are for direct through
hole mounting of the DUT to the evaluation board. It is rec-
ommended that you use the MS06.
4. Mount the DUT to the HS20 by sliding under the head of the
#6 screw and on top of the thermal washer. Tighten the nut
to the specified 8 to 10 in-lbs. (.9 to .13 N*M). Do not over
torque.
5. Install leads of the DUT into the MS06 on the evaluation board.
Use #6 self-tapping screws to secure the evaluation board
to the HS20 heat sink as shown in the assembly diagram
(Figure 1).
PARTS LIST
Part #
Description
Quantity
HS20
Heatsink
1
EVAL11
PC Board
1
MS06
Mating Socket
1
OX7R105KWN
1µF Ceramic Capacitor
2
CSR07
.1
1% Resistor
2
TWO7
Thermal Washer
1 package
HS22
Heatsink
2
BEFORE YOU GET STARTED
∑ All Apex amplifiers should be handled using proper ESD
precautions.
∑ Always use the heat sink and thermal washers included in
this kit.
∑ Always use adequate power supply bypassing.
∑ Do not change connections while the circuit is powered.
∑ Initially set all power supplies to the minimum operating levels
allowed in the device data sheet.
∑ Check for oscillations.
∑ Power ground and signal ground must be separated to avoid
switching noise in the DUT.
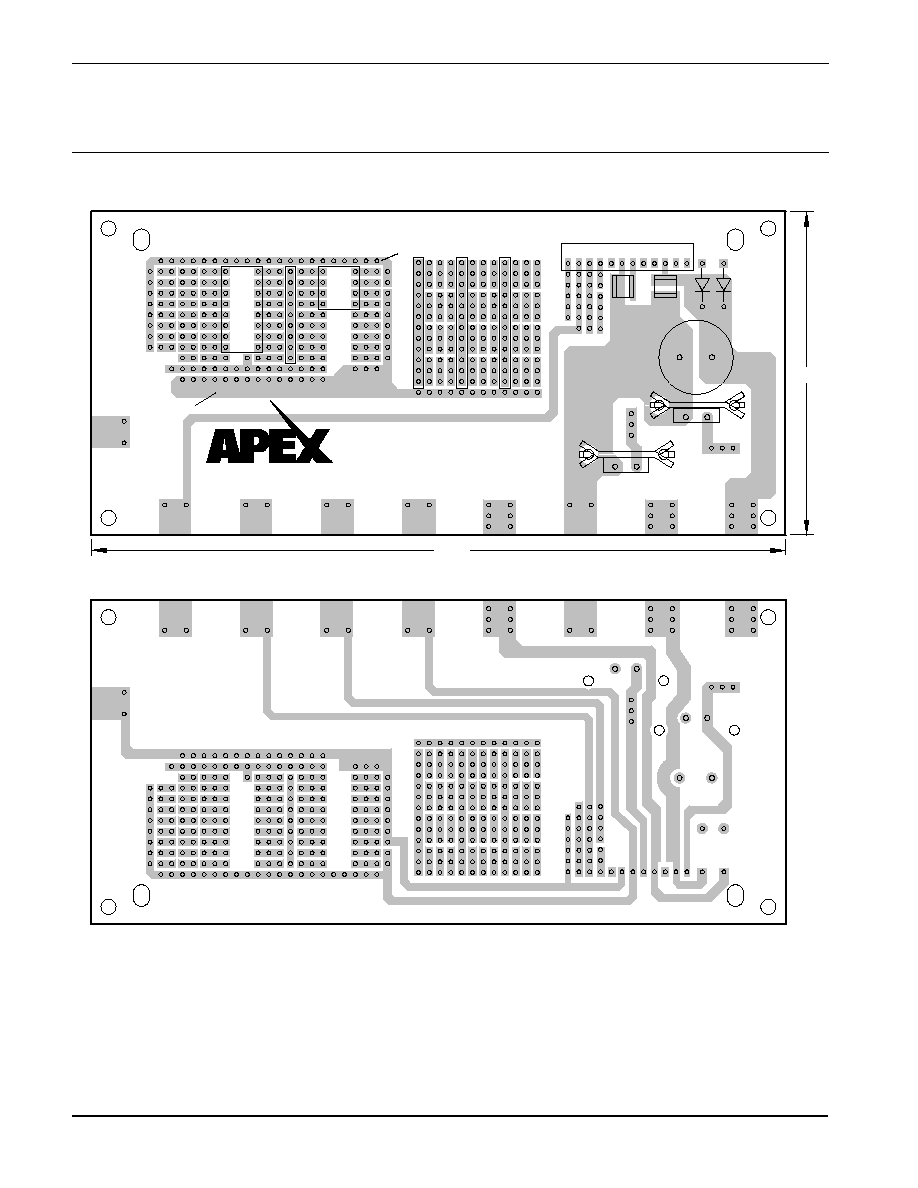
FIGURE 1.
APEX MICROTECHNOLOGY CORPORATION ∑ 5980 NORTH SHANNON ROAD ∑ TUCSON, ARIZONA 85741 ∑ USA ∑ APPLICATIONS HOTLINE: 1 (800) 546-2739
2
EK06
FIGURE 2.
EVALUATION KIT
FOR SA60 PIN-OUT
This data sheet has been carefully checked and is believed to be reliable, however, no responsibility is assumed for possible inaccuracies or omissions. All specifications are subject to change without notice.
EK06 REV C OCTOBER 2004 © 2004 Apex Microtechnology Corp.